Starting next year, I'm gonna set myself a challenge. I still have so many things (cosplays, clothing, stuff for Tegendraads) I wanna make, but never actually get to making them, simply because I don't make time for it. And today, I decided that has got to change! So from January on, I'm gonna try to finish one project every month, no matter if this is a cosplay prop, a piece of clothing I still wanted to make for myself, a commission or a new load of stuff for Tegendraads. I'll have one month to realise it!
So why not start now? Well, I AM gonna start now (or- this tuesday, because I'm still missing some fabrics for my first project), but since december is coming up, I'm not really sure I'm gonna have much time to finish it.
And why one a month? That's pretty simple, actually. Because when I would write down what I do every day, I'll probably realise that I'm wasting a huge amount of my time on... Well... Absolutely nothing, really. Hours and hours every week/month that I could've also spent on making awesome things. And thus! Let's spend those hours on awesome things. B)
By the time I start, I hope I can say I'm the proud owner of a digital camera again, so that every month, I can actually keep you all updated about my progress. Like I'm supposed to do.
So that's it for now! A post in which absolutely nothing interesting happened. BUT! I do hope it has given you all something to look forward to. I am, at least!
zaterdag 26 november 2011
dinsdag 18 oktober 2011
A small Abunai! 2011 report.
I know- I am horribly late. But I still like to write some about the event, because for me, cosplay-wise, a lot has happened.
Abunai! was helt from friday the 26th of august, till the 28th. Which was, for me, the weekend from the first week of my new schoolyear. They couldn't have planned it better. :B
 It all started the schoolyear before! I'm not the only geek at my school. I know of at least two others in my year that are into cosplay as well and they've become pretty good friends of mine. One of the two participates in the Cosplay Competition pretty much every year and for this year, she was one or two people short. So she asked me. It was gonna be a Lucky Star act, and even though I've never seen the show, I said yes because it sounded like a whole lot of fun to me. She also asked me to help with the uniforms. We had to make six summer uniforms, and she wanted to make them all herself, so she was at least sure that they were all exactly the same.
This, I can tell you, was HORROR. The unspoken rule seems to be that you can't be a proper cosplayer if you aren't a horrible procastinator, and we, ofcourse, followed that rule. It is a sad thing that we don't have pics of this.
It was a good learning experience for me, though. One thing I learned, is that pleated skirts aren't as easy as they look and pleating and ironing them goes with a LOT of pins and needles.
 Thanks to all the cosplay act work, I barely had time left to work on my own cosplays. I had planned to do the Masked Croissant and Shego for this event, but in the end I only had time left to finish Shego. About an hour before I had to go pack my stuff and by skipping two of my schooldays. Then again, I think more experienced cosplayers will now go "Deal with it." on me.
Then it was time to go! I traveled with two friends of mine, with which I also shared a hotel room. The luxury of a hotel room is unbelievable. <3
 Friday was, for us, mostly orientationday. What was there to do, who were present, where was everything (the building was a maze, I tell you), etc, etc. And since I only has two cosplays- Shego and the Lucky Star one, I spent friday in my casual clothing. That day, I ran into the two most awesome cosplays I've seen on Dutch cosplay ground. Danbo (or Cardbo), a character from the manga Yotsuba&! and a Sesame Street monster of which I only know it's made of awesome and says a lot of "Yipyipyipyip!"! Ofcourse, I asked both of them if they wanted to take a picture with me. :B
If I come across something awesome, I can get totally overexcited- a little like a kid in a candystore. I like to believe it's one of my charms. But it's also the reason that I posed almost the same on both pictures. xD
Back in the hotel and after a good cup of tea with some delicious cake, we went to our room and I decided that I was gonna do what I still wanted to do for years- take a picture of yourself while brushing your teeth. Don't ask me why, I just always had that craving, somehow. Which resulted in the following picture:
 Then, after a good night's sleep, there was saturday. The day of the Cosplay compo. I had to be there around 10 with the six skirts I had made and bumped on a huge line at the door. I explained one of the gophers I had to be indoors early because I had to be there for the acts, but he told me, "Doesn't matter, just get in line.". The damn bastard didn't even check if I had a day- or weekendticket (the line was for people with a dayticket)! After about half an hour, it seemed the guy was just a complete douche and uninformed and I could get inside. After which we had to wait more than an hour before we could start rehearsing the acts. Ofcourse. At least gave us enough time to change.
  One of the things that Abunai is well-known for are the technick fails with the Cosplay- and AMV contests. And this year wasn't anything different. Though despite that, the act went really good and was pretty amusing, according to the people we asked. The whole thing was recorded, but the vid isn't online yet. I'll put a link here when it is, ofcourse! What I CAN give you, is a pic of us on stage. (I'm all on the left- aren't you proud of me? =w= )
 While my friends were waiting for me, they got me a bottle with juice to drink, because I was EXHAUSTED. I seemed pretty happy with it, and for some reason placed it on my head. (my wig made my head pretty flat on top) This had to go on picture, according to one of them, and thus I striked a pose. I am a really wise Misao. *nods*

Abunai! was helt from friday the 26th of august, till the 28th. Which was, for me, the weekend from the first week of my new schoolyear. They couldn't have planned it better. :B
This, I can tell you, was HORROR. The unspoken rule seems to be that you can't be a proper cosplayer if you aren't a horrible procastinator, and we, ofcourse, followed that rule. It is a sad thing that we don't have pics of this.
It was a good learning experience for me, though. One thing I learned, is that pleated skirts aren't as easy as they look and pleating and ironing them goes with a LOT of pins and needles.

Then it was time to go! I traveled with two friends of mine, with which I also shared a hotel room. The luxury of a hotel room is unbelievable. <3
 Friday was, for us, mostly orientationday. What was there to do, who were present, where was everything (the building was a maze, I tell you), etc, etc. And since I only has two cosplays- Shego and the Lucky Star one, I spent friday in my casual clothing. That day, I ran into the two most awesome cosplays I've seen on Dutch cosplay ground. Danbo (or Cardbo), a character from the manga Yotsuba&! and a Sesame Street monster of which I only know it's made of awesome and says a lot of "Yipyipyipyip!"! Ofcourse, I asked both of them if they wanted to take a picture with me. :B
If I come across something awesome, I can get totally overexcited- a little like a kid in a candystore. I like to believe it's one of my charms. But it's also the reason that I posed almost the same on both pictures. xD
Back in the hotel and after a good cup of tea with some delicious cake, we went to our room and I decided that I was gonna do what I still wanted to do for years- take a picture of yourself while brushing your teeth. Don't ask me why, I just always had that craving, somehow. Which resulted in the following picture:
 |
| From left to right: Sab, me and Liza |
 Then, after a good night's sleep, there was saturday. The day of the Cosplay compo. I had to be there around 10 with the six skirts I had made and bumped on a huge line at the door. I explained one of the gophers I had to be indoors early because I had to be there for the acts, but he told me, "Doesn't matter, just get in line.". The damn bastard didn't even check if I had a day- or weekendticket (the line was for people with a dayticket)! After about half an hour, it seemed the guy was just a complete douche and uninformed and I could get inside. After which we had to wait more than an hour before we could start rehearsing the acts. Ofcourse. At least gave us enough time to change.
 In the act, I had to fill in the role of Misao Kusakabe. I still hadn't had the time to watch the series, so I knew pretty much NOTHING about this character. But I got told, "You two are character-wise pretty much alike. Just be yourself. C: " And thus I did.
 One of the things that Abunai is well-known for are the technick fails with the Cosplay- and AMV contests. And this year wasn't anything different. Though despite that, the act went really good and was pretty amusing, according to the people we asked. The whole thing was recorded, but the vid isn't online yet. I'll put a link here when it is, ofcourse! What I CAN give you, is a pic of us on stage. (I'm all on the left- aren't you proud of me? =w= )
Here's a group pic, btw!
 |
| On the left is our brilliant Gaga Pudding- we gave Lady Gaga a role in our huble little act as well! |
I decided to spend the rest of the day in my cosplay, it already being around 3 PM and being too lazy to dress back into my casual clothes. Plus the cosplay was comfortable. I was pretty tired from all the act fuzz, which resulted in some pretty dull pictures, of which I'll share the most awesome with you:
 While my friends were waiting for me, they got me a bottle with juice to drink, because I was EXHAUSTED. I seemed pretty happy with it, and for some reason placed it on my head. (my wig made my head pretty flat on top) This had to go on picture, according to one of them, and thus I striked a pose. I am a really wise Misao. *nods*
 And thus came sunday. This was the day I'd walk around in my Shego cosplay. I already got in my cosplay at the hotel (the looks at breakfast from the other guests were priceless), but I'm still a bit of a makeup noob, so took my makeup gear with me and asked a dear friend of mine to do it for me, because I know of her that she likes to do that kind of stuff. She made me look really evil! <3
I got recognised a LOT. My Misao cosplay wasn't all that recognisable- at least not without the rest of my Lucky Star cast. So I wasn't used to all that fuzz yet. It was really nice and funny to hear everyone whisper about you behind your back (in a positive way), and a (for me) surprisingly big amount of people wanted a pic of me. Only Sab was left that day to spend time with me, and I'm happy she thought of it as amusing, having to stop EVERY time because someone walked up to me for a picture!
I think the most memorable non-shoot moment of that day was in the dealerroom, when a 1.90 meter long Red Scout came walking up to me asking me "Can I hug you? You were always my favourite character. <3 ". On which I gave him a hug, replying (in character) "Ohh, but baby, I'm everyone's favourite character~"
A friend of my Kim is a pretty big Kigo (KimxShego) fan and she asked us for a small shoot. We were happy to participate. And thus, next, I shall share with you some of them pictures! Also including some other pics of me that were made that day, btw.
 |
| I like this one- It's Kim, Lizz and me discussing some pose possibilities. I think it's one of the few pics of me from that day out of character. |
 |
| And then I walked into Superbig! I thought she rocked my socks, and she thought I was awesome, so ofcourse we had to go on picture together! |
 |
| Here's one from the shoot. There aren't many moments Shego is caught off-guard. Go Kimmie, grab that chance! |
 |
| And the pic that showed me the biggest flaw in my costume: my crotch. B) I still like it, though! |
If you wanna see more pics, also from Abunai! itself, you can visit Lizz's site, or give her gallery a visit!
So far my weekend report. I loved it. Spending time with friends again, new experiences, everything. <3
And to close this post off, a pic of my most geekish part of my Abunai! dealerroom haul!
donderdag 6 oktober 2011
Why I decided to cosplay Shego and styling her wig
 It's been a while! And I'm TERRIBLY sorry. And the worst part is- I don't have a proper excuse at all. After my last blogpost, I didn't do anything but work on my cosplays (and boy, was I on deadlines! D: ). The other cosplay I had planned for Abunai! 2011 was Shego, the sarcastic villain from Disney's Kim Possible. Shego has a certain charm about her to me. She's evil, yes, and she'd fight Kim till her last breath. But at the same time, she's smart, loyal and caring. I like this contrast in her, though I never know the exact reason why I'm drawn to a certain character.
I just know that when a friend of mine said she'd always wanted to cosplay Kim, I grabbed the opportunity with both hands!
Too bad my camera died halfway the cosplay process, and I can't find the pics back that I had made of her costume... So I'm gonna give you as much as possible.
In this post, I'm gonna show you how I styled her wig. If you've styled wigs before, you're probably gonna curse me- but as I already said once, I'm still only learning!


This is what it looked like from the top and back. Looking back on it, I think it's kinda hilarious. :')
You can also see the braid on the right picture. What you can also see, is that I (tried to) split the hair on the braidlines. Made it way easier, logically.

It looks pretty bad like this, and it was. :') It'll get less though.
Combing it up proved to be pretty hard. But then again, a kanekalon wig reacts a whole lot different on what you do with it than real hair!
 Here's what it looked like when I was done with the middle-lower half. It looks horrible, I know, and it would probably send shivers down a professional cosplayer's spine, but still. :') I used a lot of hairspray along the way to keep it up like this.
 After this, I started combing up the middle-upper half. And instead of combing on top of the selections of hair, I combed it up on the lower side. Again, using a lot of hairspray along the way.
 Done with this, I let the middle-upper half hang down on the lower half, and it formed a really weird bobble. With help from some water to unharden the hairspray where needed, I evened it out a little. Because I had combed up the lower half of the middle-upper part, the hair on top wasn't all strangled. You could still see I flicked up the hair midback, though...
Done with this, I finally took the knot on top out and tried to divide the hair evenly over the rest, making the combing up less visible. Using a lot of hairspray again to keep it all in place, I tried to hide the strangled-up parts as good as possible. I succeeded a little.
Here's how it finally looked like:

Thanks to the extra light on the middle picture, it looks a lot worse than it actually looked in reallife.
Most people are probably gonna say this is no way to treat a wig, but this is what sounded most logical to me back then (and now still) and it worked. The hair stood out bigger, but not unnaturally big. It was just perfect, really. And that it maybe looked a little messy didn't matter all that much, seeing as Shego's hair is wavy from itself. Next time I wanna do something like this, I think I'm gonna try to find another way to make the hair look bigger. C:
Well, there! A Shego wig! I'm proud of it. It looks incredibly Scene-style without the actual cosplay, but look what it does when I'm all dressed up!

Can you believe that's the same wig? Well, I certainly can't! Also look at my Kim. Isn't she pretty? <3
More pictures can be found on Lizz's site, or in the file with all the pictures Melissa shot that event.
For next time, I'll try to find the pics back that I DID make while working on this cosplay. They have to be somewhere, right? D:
Making this cosplay certainly was an interesting process, because I had to work with Lycra, so I do think it'll be interesting to share. C:
And that'll be all for today. I'll try to kick up the next blog posts a little faster! x3
dinsdag 19 juli 2011
Why I decided to cosplay the Masked Croissant and progress on her mask
As promised!
If you know Air Gear already, you probably also know that this series was mostly written and drawn for a male audience and it's impossible to ignore the amount of fanservice. And the Masked Croissant is a perfect example of this fanservice. It's a great excuse for female cosplayers to pick something sexy for a change though.
... Which isn't why I chose to cosplay her, by the way.
Ringo is probably my favourite female character from Air Gear and I love how she's all confused about being in love with Ikki. It makes her both really vulnerable and really strong at the same time. All of her costumes are really awesome (imo) and it would be great if I would get the opportunity to make them all, once. But till now, I'm gonna keep it at this one. Because, out of all, this one is at least the one with the most storyline (and skin, olololol). That, and if I'm not mistaking, I'd be the first dutch cosplayer to cosplay her.
(don't get me wrong, being the first isn't my ultimate goal, but I'd never cosplay a Naruto character (for example), because I truly think that's done WAY too many times by now) (plus, it's fun to be unique. B) )
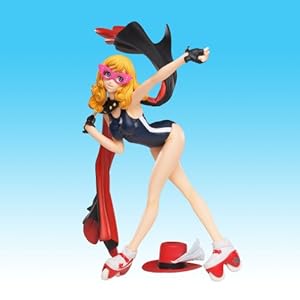 I prefer manga over anime and I don't even know if she appears in the anime series in this form, so I picked the figurine as an example for my cosplay. I already finished her school bathsuit yesterday, but because I don't have progress pics of that one and I can't make a proper pic of the end result because my mom broke the big mirror a few days ago, I'm gonna skip that one.
I DID make pictures of making her mask, though! Not as many as I should, because it was halfway the process that I decided to start a blog, but it'll do for a first entry.
Her mask was my first attempt on a cosplay prop too, which meant NOT working with fabric for once, and it was a nice change of materials for once.
I started off with drawing out the mask with all its details on a thin piece of cardboard (originally an icecream box, ripped apart). Which looked like this, in the end:

Because I thought just a thin piece of cardboard isn't mask-worthy and because it's a little thicker than just this on the figure too, I decided to make a clay mold of it too, using this as the base. So I went shopping! And came home with the following:


If you know Air Gear already, you probably also know that this series was mostly written and drawn for a male audience and it's impossible to ignore the amount of fanservice. And the Masked Croissant is a perfect example of this fanservice. It's a great excuse for female cosplayers to pick something sexy for a change though.
... Which isn't why I chose to cosplay her, by the way.
Ringo is probably my favourite female character from Air Gear and I love how she's all confused about being in love with Ikki. It makes her both really vulnerable and really strong at the same time. All of her costumes are really awesome (imo) and it would be great if I would get the opportunity to make them all, once. But till now, I'm gonna keep it at this one. Because, out of all, this one is at least the one with the most storyline (and skin, olololol). That, and if I'm not mistaking, I'd be the first dutch cosplayer to cosplay her.
(don't get me wrong, being the first isn't my ultimate goal, but I'd never cosplay a Naruto character (for example), because I truly think that's done WAY too many times by now) (plus, it's fun to be unique. B) )
I prefer manga over anime and I don't even know if she appears in the anime series in this form, so I picked the figurine as an example for my cosplay. I already finished her school bathsuit yesterday, but because I don't have progress pics of that one and I can't make a proper pic of the end result because my mom broke the big mirror a few days ago, I'm gonna skip that one.I DID make pictures of making her mask, though! Not as many as I should, because it was halfway the process that I decided to start a blog, but it'll do for a first entry.
Her mask was my first attempt on a cosplay prop too, which meant NOT working with fabric for once, and it was a nice change of materials for once.
I started off with drawing out the mask with all its details on a thin piece of cardboard (originally an icecream box, ripped apart). Which looked like this, in the end:

(this is my I'm-sorry-but-I'm-having-a-working-at-home-day-outfit, by the way. Plain shirt, my fuzzy hair tied back and being extra fuzzy, and a total lack of makeup. Also yay for horrible lighting!)
Because I thought just a thin piece of cardboard isn't mask-worthy and because it's a little thicker than just this on the figure too, I decided to make a clay mold of it too, using this as the base. So I went shopping! And came home with the following:

(I already owned the glue gun, btw)
I got myself: Darwi extra light clay (approx €6,70), two small tubes of acrylpaint and two brushes because I'm out of brushes. And this is where the lack of pictures comes in.
After getting all this, I took a small piece (about 1/6th or so) of the clay and rolled it out until it was half a centimeter thick. I placed the cardboard mold on it and cut the clay arount the edges of the mold. As you can see, there's a line ON the mask too. So I cut the mold in two, one half staying in one piece and the other half wreckable. So I cut out the inner form and traced that one carefully on the clay, about a millimeter deep, with a toothpick.
The next step was a tricky one- a mask isn't flat, so I wanted it to dry up/harden out in a small bow. I had cut an extra mold from the piece of cardboard that was only the basic form, not the details on it. I made it stand up a bit round by sticking the two outer points together with sticky tape, carefully placed the clay mold on top of that, lay it on a safe place in my bedroom (which was a challenge, because my room is a royal mess) and then I waited.
The following day, it looked like this:

I was proud of self. C: (on the lower half of the pic you see my wrecked example mold)
The awesome thing about this form of clay, is that it isn't really "clay" as most of us know it. The stuff really is insanely light and when it's still soft and kneadable it isn't the nicest to work with. Where actual clay is a little sticky and two pieces of the same clay don't have a hard time being knead together again, this stuff barely sticks to your fingers, it's slightly crumbly and when you try to knead two pieces together again, you'll find out that it doesn't attach to itself as easy as real clay does.
There's a lot you get back for it though. Once the stuff has hardened out, it's really easy to work with. It's still as light as first and it doesn't harden out as hard as normal clay- on the contrary, it even feels a little gummy. You can still push it in a little with your fingers and it can still bend a little. The surface feels almost silky soft and smoothening it out with sandpaper goes really easy as well. Even though I'm still a total props n00b, I already concider this stuff brilliant.
... Too bad that, even though it's slightly bendable, it can still break. Which is, ofcourse, what I did. >_>
This is what it looked like after glue-ing it together again:

Thank god the stuff doesn't really crumble when it breaks so you could easily put it together again, without missing bits. The crack is still visible though, and it almost looks like it has a scar now. ;^;
I smoothened the crack out again by taking a bit of the clay and making it stickier with a little water.
With a piece of sandpaper I smoothened the whole thing out, including the bobble the mask somehow got left to the lower crack after glue-ing it together again. :/
For extra security and for making it easier to attach a string on it, I glued the mask on the piece of cardboard I also used to let it dry up in a curve. Which looked like this at the back:

I had to cut off a lot of extra cardboard, because somehow the clay had shrunk a little in the drying process. That, and I don't want the cardboar to fit around the edges perfectly, because you'd see it from the sides then. I made holes in the cardboard and when the clay was still soft, I made small, oval-like denches in the clay, so I can still pull a string through it without having to see it on the front.
I'm not sure how well gluegun-glue attaches on this form of clay yet, though! When some pieces of the just-glued-on cardboard were still a little warm from the glue, I found one corner a little easy to pull off. But I think I'll find out the details along the way.
And then- PAINT! \o/
Painting went better than I had expected, though I still needed a layer or three until the pink was nice and even on the whole mask. The paint dried pretty fast though, so when I had finished one layer, I could already start the next on the point I had painted the first.
The end result till now looks like the following:

Sadly, you can still see the scar/crack on the left, but it'll have to do for now. I painted the yellow spots on by using the already abused half of the first cardboard mask and taking the small holes out to be able to trace them. When I had done so, I perfectionized the spots without the mold.
Now all that's left is finding a way for it to stay on my face! This seems to be a tough one, because it should lean on my nose, but not against my forehead- there has to be a centimeter-or-so space in between. Do you have any idea how to solve this?
-SO YEAH. So far for now~!
A welcome.
And there it is. A blog. Something I've been talking and thinking about for ages (or- actually only a day and a half).
So here's what this is: I am a starting cosplayer (finished cosplay rate: one.) and a fashion student. I really like working with my hands (i.e. sewing, mostly, but also cross-stitching, working with clay or any other way of oldschool self-expression in 3D) and I always concider it fun and useful if I read about other cosplayers/costume designers and how they overwon their difficulties on a certain costume, prop or anything else. Which got me thinking- what if I start a blog about that kinda stuff? A blog on which I report about (almost) everything costume-related I do, keep you updated about the progress, difficulties, problems that occur and how I (try to) solve them and tips and tricks I find out and come across. And since I'm still only a starter, I'm pretty sure I'll make enough faults for you to learn from!
Except for that... This is also a way for me to be able to look back on my own progress throughout the days/weeks/months/years and if I suddenly forget this-or-that trick I used, I'd always be able to find it back here, hopefully including pictures that make my story clearer.
I'm gonna try to do everything in English, so that as much as possible people can profit from it. But Dutch is my mother language still, so please forgive me if I don't know the right terms for things sometimes, or if my use of English is just simply wonky.
That's it for now. At the moment, I am working on two costumes- the Masked Croissant (or Mask of Croissant or the other thousand names that she goes by in different countries), the "disguise" Ringo used in Air Gear to help out Ikki and his team, and Kim Possible's Shego because she rocks my socks. I'll try to update here about every different piece of costume that I have to make for both (though I already finished Ringo's bathing suit, sorry), starting with Ringo's mask. Hopefully this midday already, even.
That, and ofcourse try to personalize my page a bit. Because now, it looks incredibly plain and standard-layout-ish. (which it is, ofcourse)
... But now mom's going pissed on me not sitting at the kitchen table for lunch, so you guys have to do with this for a few hours. xD
(hopefully) till soon!
Malthinae
Abonneren op:
Posts (Atom)